

Each piece of furniture starts as a picture in somebody’s head. An entertainment center designed for the main sitting area. A workstation for a new office. A reception counter for a client who wants “something modern but warm.” The picture feels completely clear right up to the moment which you try to explain it to a carpenter.
About this wide a little taller than a usual desk is not something a workshop can build from. That gap between the idea and the instruction is exactly what a furniture simple drawing fills. It’s a plain scaled sketch that turns what you imagine into lines and numbers which anyone can read.
The good news is here? You don’t need drawing talent or expensive software. A pencil, a ruler and a sheet of graph paper will do it greatly. In this beginner’s guide we’ll cover what a furniture simple drawing really is, the tools are worth picking up, how scale works, the basic symbols and a step by step example you can try today.
If you’ve read our earlier guide on types of furniture drawings, you already know the four main views: plan, elevation, section and detail. This post is the hands on follow up. Here, you’ll learn to make one yourself.
What Is a Furniture Simple Drawing?
A furniture simple drawing is a clean, flat scaled drawing of a piece of furniture or a room layout. It view size, shape and position and nothing more. There is No shading, perspective, artistic tricks. Think of it as the first honest draft of a proper furniture plan.
It lay in between a napkin sketch and a factory drawing:
| Type | Scale and accuracy | Best used for |
|---|---|---|
| Rough sketch | Freehand, no scale | Capturing an idea quickly |
| Furniture simple drawing | Scaled, with basic dimensions | Planning layouts and briefing a designer or workshop |
| Shop drawing | Fully dimensioned, with joinery, hardware and material details | Manufacturing and installation |
| 3D render | Realistic picture | Showing the finished look to a client |
A furniture simple drawing won’t replace a shop drawing. What it does is make every later step faster. Because everyone starts from the same clear picture.
Which Views Should Your First Furniture Simple Drawing Include?
Beginners often ask how many views are enough. For a first furniture simple drawing two views carry most of the weight:
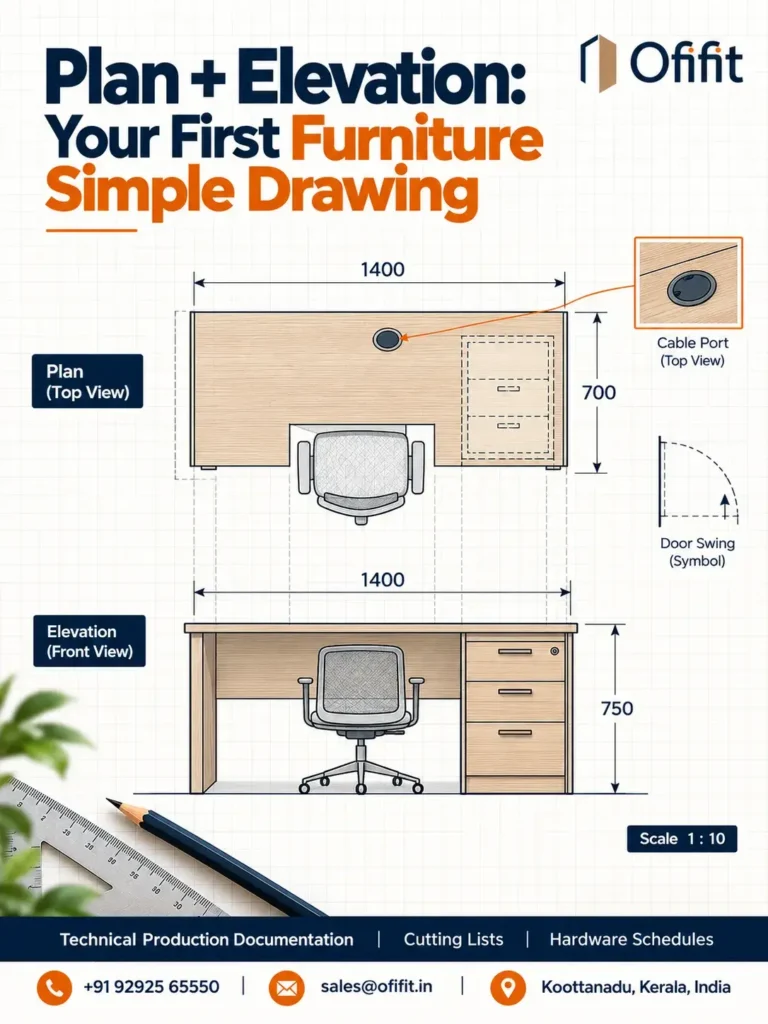
• Plan (top view): shows width, depth, shape and where each part sits. Start here every time.
• Front elevation: shows height, door and drawer layout and visible finishes.
• Side elevation (optional): useful when the depth changes with height, like a stepped shelf or a sloped reception front.
• Simple section (optional): helps when you want to show shelf spacing or board thickness inside a cabinet.
Start by drawing the plan then project the elevation directly beneath it. Ensuring both widths match serves as your fastest self-correction tool. As your confidence builds your basic furniture drawings can naturally incorporate a section or two making the layout resemble the final product.
Why Learning a Furniture Simple Drawing Pays Off
You might be a designer, a site engineer, a showroom owner or someone fitting out a first office. Either way a furniture simple drawing helps you in a few very practical ways:
• You catch size problems early. A desk that looks fine in a photo may not fit between two columns.
• You brief people better. Scaled drawings allow designers and workshops to estimate prices quicker than any verbal or written description.
• You test layouts cheaply. Moving a pencil line costs nothing. Shift a finished wardrobe costs a lot.
• You communicate the same language as the factory. Even basic drawing habits make the conversations with drafters and carpenters better and smoother.
This matters a great deal across the Gulf, where fit out schedules are tight. At Ofifit a drafting studio in Koottanad, Kerala we support furniture manufacturers, joinery companies and fit out contractors in the UAE, Saudi Arabia, Qatar, Kuwait, Oman and Bahrain. Many projects reach us as a phone photo or a hand sketch. A clear furniture simple drawing turns that first message into a quote ready brief.
Equips that You Need for a Furniture Simple Drawing
always Keep the kit small. Fancy tools won’t fix a weak habit meanwhile a few basics will build a strong one.
| Tool | What it’s for | Tip |
|---|---|---|
| HB or 2B pencil | Clean, erasable lines | Keep it sharp so lines stay thin |
| Eraser | Fixing mistakes | A soft white eraser won’t smudge the page |
| Graph paper (5 mm grid) | Keeping lines straight and scale easy | Perfect for a first furniture simple drawing |
| Steel ruler or scale ruler | Straight lines and quick scale reading | A scale ruler saves a lot of maths |
| Set square | Right angles at corners | Furniture is full of 90° corners |
| Tape measure | Taking real measurements | Measure twice, draw once |
| Compass or circle template | Round tops, knobs, cut-outs | Optional but handy |
Once you’re comfortable with then you can switch to a free CAD app or a tablet with a stylus. The logic of a furniture simple drawing stays the same on screen: scale, lines, dimensions and notes.
Measure the Space Before You Start Your Furniture Simple Drawing
A drawing is only as good as the numbers behind it. Give yourself ten minutes with a tape measure before you touch the pencil and your furniture simple drawing you’ll save yourself a lot of erasing later.
• Measure wall lengths at floor level and at desk height, because walls are rarely as straight as they look.
• Note the ceiling height and anything that sticks out such as columns, radiators or air conditioning units.
• Record widths of door and window. plus how far each door swings open.
• Remember to mark power, data and water points. because furniture often has to work around them.
• Check lift and corridor sizes if the piece will arrive fully built.
• Take photos of each wall along with the tape visible. They help when a number looks unclear later.
Note all dimensions in mm on a rough working draft prior to entering them onto your scaled sheet. If a measurement feels odd measure it again. Two minutes of checking beats two days of rework.
Scale in a Furniture Simple Drawing, Explained
Scale is simply how much smaller your drawing is. At 1:10 every 1 mm on paper equal for 10 mm in real life. A 1400 mm desk becomes a neat 140 mm line on your draw.
Here are the scales you’ll use most:
| Scale | 1 mm on paper equals | Use it for |
|---|---|---|
| 1:1 | 1 mm | Tiny details, like an edge profile |
| 1:5 | 5 mm | Joints and hardware positions |
| 1:10 | 10 mm | Single pieces, such as a desk or bedside table |
| 1:20 | 20 mm | Larger units, like wardrobes or reception counters |
| 1:50 | 50 mm | Full room layouts |
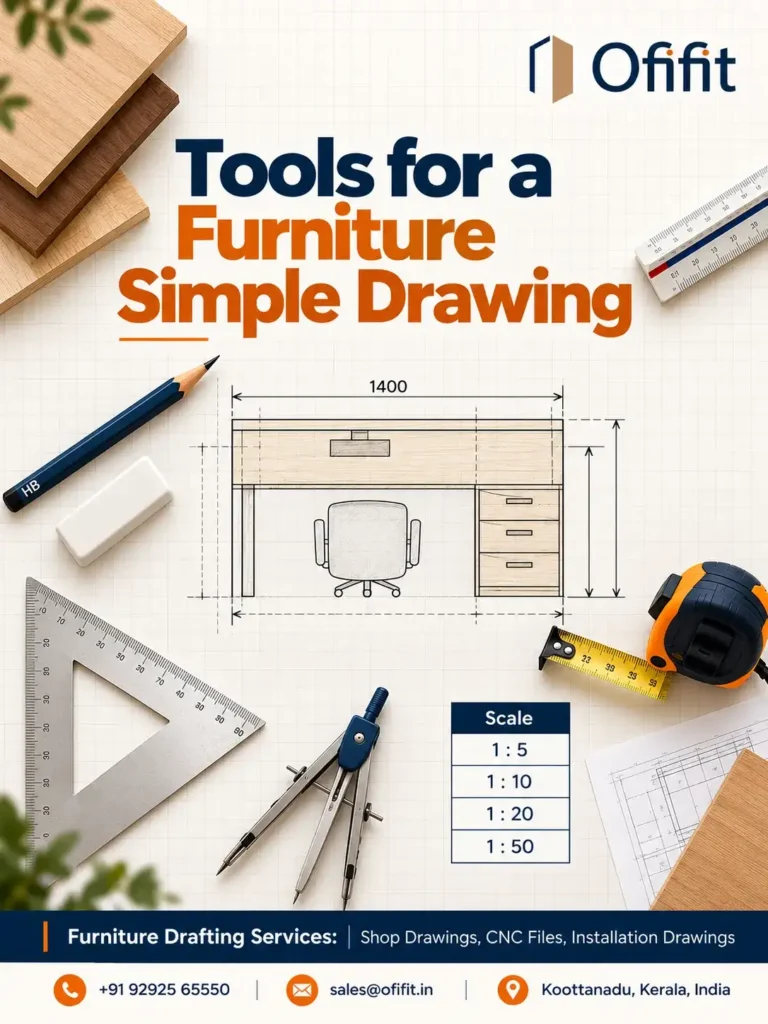
Graph paper makes this almost effortless. When working on 5 mm graph paper a single grid box represents 50 mm using a 1:10 scale or 250 mm if drawn at 1:50. Pick one scale per drawing. write it near the title and don’t change it in halfway.
Here is a rule that most experienced drafters follow: if a dimension is written it overrules the drawn line. If the printed line and the number disagree. trust the number and fix the line.
Basic Lines and Symbols You Should Know
A furniture simple drawing speaks through a small set of lines and symbols. Learn these and most sheets will start to make sense.
| Line or symbol | How it looks | What it means |
|---|---|---|
| Thick solid line | Bold, continuous | Outer edge of the furniture |
| Thin solid line | Light, continuous | Inner edges, dimension lines, projection lines |
| Dashed line | Short, even dashes | Concealed components such as an interior desk drawer |
| Chain line | Long dash, short dash | Centre lines and section cuts |
| Quarter-circle arc | A door outline with an arc | Direction a hinged door swings |
| Arrowed lines on a door | Two arrows pointing opposite ways | Sliding door |
| Dimension line | A slender stroke featuring terminal markers alongside a numerical value | Size in millimetres |
| Section marker | Letters like A–A with arrows | Where an imaginary cut is made |
There’s no need to memorise the table. Leave the table within reach while you practise your first few drawings. The symbols stick faster than you’d expect.
Dimensions in a Furniture Simple Drawing: What Goes Where
Dimensions are what make a sketch usable. Stick to these habits and your dimensions will stay clean and readable:
- Keep dimension lines clear of the drawing itself, off to the side.
- Begin with the overall width, depth and height. Add the smaller sizes after that.
- Write numbers so they’re easy to read, either horizontally or rotated to read from the right-hand side.
- Mention each size only once, since a repeated number can end up contradicting itself.
- If several small sizes run along one side, make sure they add up to the overall figure.
- State your unit up in the corner. That way the dimensions themselves stay short and uncluttered.
Here’s an example. Your desk is 1400 mm wide, with a 400 mm pedestal and 1000 mm of knee space. The two inner sizes have to add up to the full width. A mismatch means there’s an error to find. Check each size properly, and your furniture simple drawing becomes something the carpenter and the installer can follow without calling you.
Drawing a Furniture Simple Drawing from Scratch
Our example is an office desk with a pedestal of three drawers. It measures 1400 mm wide, 700 mm deep and 750 mm high, and we’ll work at 1:10 on graph paper.
Step 1: Collect your measurements. Measure the desk, but also the space around it, such as the wall length, the door width and any columns. A furniture simple drawing is only useful if the piece fits the real room.
Step 2: Set the unit and scale before you draw. Most Gulf projects use millimetres. Put a small note in the corner: “All dimensions in mm, scale 1:10.”
Step 3: Draw the plan (top view). Mark a rectangle of 140 mm by 70 mm. That’s your desktop viewed from overhead.. Use a thick line for the outline.
Step 4: Show the hidden parts. The pedestal sits under the top, so draw it with a dashed line. Divide 400 mm by 10 and you get 40 mm, so that’s how wide the pedestal rectangle should be on paper. Add a small dashed circle for the cable port, about 6 mm across on paper.
Step 5: Draw the front elevation.Position the elevation right beneath the plan view, but don’t let the two touch. Make it 140 mm wide and 75 mm tall. Light vertical guide lines from the plan will keep the widths matching.
Step 6: Fill in the visible details. Draw the three drawer fronts on the pedestal side. Desktops usually run 25 to 30 mm thick, so give yours a strip about 2.5 to 3 mm deep on the sheet. One line on the other side will do for the leg or panel.
Step 7: Add dimensions. Mark the full width, depth and height in the margin around the drawing. Now zoom in on the details. Give the pedestal a width, each drawer a height, and the knee opening a clear gap measurement.
Step 8: Add short notes. List what the piece is made of, how it’s finished and how the edges are treated. A typical note reads “18 mm melamine board, laminate top, 2 mm edge band.
Step 9: Check it all. Compare the plan and elevation widths and re-read every number. Then hand it to someone else. You’ve looked at this drawing too long to judge it. A second person can spot a wrong number almost instantly, even after you’ve checked the sheet several times yourself.
Let’s see what each real measurement becomes on your sheet:
| Part | Real size | Size on paper at 1:10 |
|---|---|---|
| Overall width | 1400 mm | 140 mm |
| Overall depth | 700 mm | 70 mm |
| Overall height | 750 mm | 75 mm |
| Pedestal width | 400 mm | 40 mm |
| Desktop thickness | 25 mm | 2.5 mm |
That’s it. Repeat the same process for a TV unit, for a bedside table or a reception counter and your furniture simple drawing skills will grow fast.
Practice Drawing: A Simple TV Unit
Once the desk feels comfortable try a second furniture simple drawing with different parts. A TV unit is a higher choice. because it mixes open space with doors. Work in a ratio at 1:20 on graph paper and keep the unit at simultaneously in 1800 mm wide, 400 mm deep and 450 mm high respectively.
Divide the width into equal three parts of 600 mm: a door on the left an open shelf in the center and a door on the right side respectively. Draw a plan first. then the front elevation directly just below it. Mark the each door’s swing direction with a light line and add a note for a cable cut out at the back of the center bay.
| Part | Real size | Size on paper at 1:20 |
|---|---|---|
| Overall width | 1800 mm | 90 mm |
| Overall depth | 400 mm | 20 mm |
| Overall height | 450 mm | 22.5 mm |
| Each bay width | 600 mm | 30 mm |
Notice what changed. The scale, the number of parts and the door symbols are new, but the routine is exactly the same. That repeatable routine is the real skill behind every furniture simple drawing.
Standard Furniture Sizes to Start From
When you’re not sure where to begin these common ranges are a sensible starting point. Always adjust them to your project. your users and your supplier’s boards and hardware.
| Item | Typical size range |
|---|---|
| Office desk height | 720 to 750 mm |
| Office desk depth | 600 to 800 mm |
| Task chair seat height | 420 to 480 mm |
| Dining table height | 720 to 750 mm |
| Sofa seat height | 400 to 450 mm |
| Coffee table height | 400 to 450 mm |
| Wardrobe depth | 550 to 650 mm |
| Kitchen base cabinet height | 850 to 900 mm |
| Main walkway clearance | About 900 to 1000 mm |
Bed and mattress sizes negotiable by market. so confirm them with your supplier before you draw.
From Paper to Screen: Going Digital
Papers are great for learning. When you are ready for share your work scan or photograph your furniture simple drawing straight on in good light with a ruler visible for reference. if you can Send it as a PDF .
If you move to a CAD or drawing app must follow the same habits: one scale, mm, clean line weights and clear notes. Draw plan and elevation on separate layers. so changes stay tidy. A digital furniture simple drawing is also far easier for a drafter to pick up and refine later.
7 Tips to Improve to Furniture Simple Drawing
- Draw lightly first. Darken the final lines only after when everything fits.
- Use a ruler for every straight line detailing. Freehand lines wobble and mislead which ruin the whole drawings.
- Keep line weights consistent. Thick for outlines thin for dimensions.
- Label every part, even the obvious ones.
- Draw the room beside the piece. Clashes with walls and doors show up early.
- Redraw once again. The second version is always cleaner and shows what you missed.
- Ask a carpenter or drafter to cross check it. One honest comment teach us more than a ten tutorials.
Commit with a furniture simple drawing a week for a month. A bedside table, a shelf, a school desk. By the time of fourth sheet you’ll notice your lines are straighter and your numbers are far more reliable and accurate.
Common Mistakes in a Furniture Simple Drawing
Everyone makes these mistakes at the start. Here’s how to dodge them.
| Mistake | What goes wrong | Quick fix |
|---|---|---|
| Changing scale halfway | Parts don’t match each other | Fix one scale per sheet |
| Missing dimensions | Others must guess sizes | Add overall and key internal sizes |
| Mixing units | Millimetres read as centimetres | Use millimetres everywhere |
| Forgetting the room | Piece won’t pass the door or lift | Note door, lift and corridor widths |
| Skipping hidden parts | Drawers and shelves get missed | Show them with dashed lines |
| No title or date | Old versions get used by mistake | Add a small title block with the date |
Most of these cost nothing to fix on paper. On site, they can cost days.
Using a Furniture Simple Drawing Across Different Projects
The same basic skills work almost anywhere but each space asks its own questions. Here is what your drawing should highlight in each case:
| Project type | What your drawing should highlight |
|---|---|
| Residential and villas | Kitchen, wardrobe and TV unit sizes, door swings and walking space |
| Office and commercial | Desk rows, workstation spacing, cable routes and meeting room seating |
| Hospitality and hotels | Reception counters, bed and bedside layouts, built-in storage and luggage space |
| Retail and fit-out | Display units, counters, shelving heights and customer circulation |
Ofifit prepares drawings for all four of these project types and the pattern is the same every time: the clearer the first furniture simple drawing, the smoother everything after it. Fewer questions, fewer revisions and a faster path way to production.
When to Hand Your Furniture Simple Drawing to a Professional
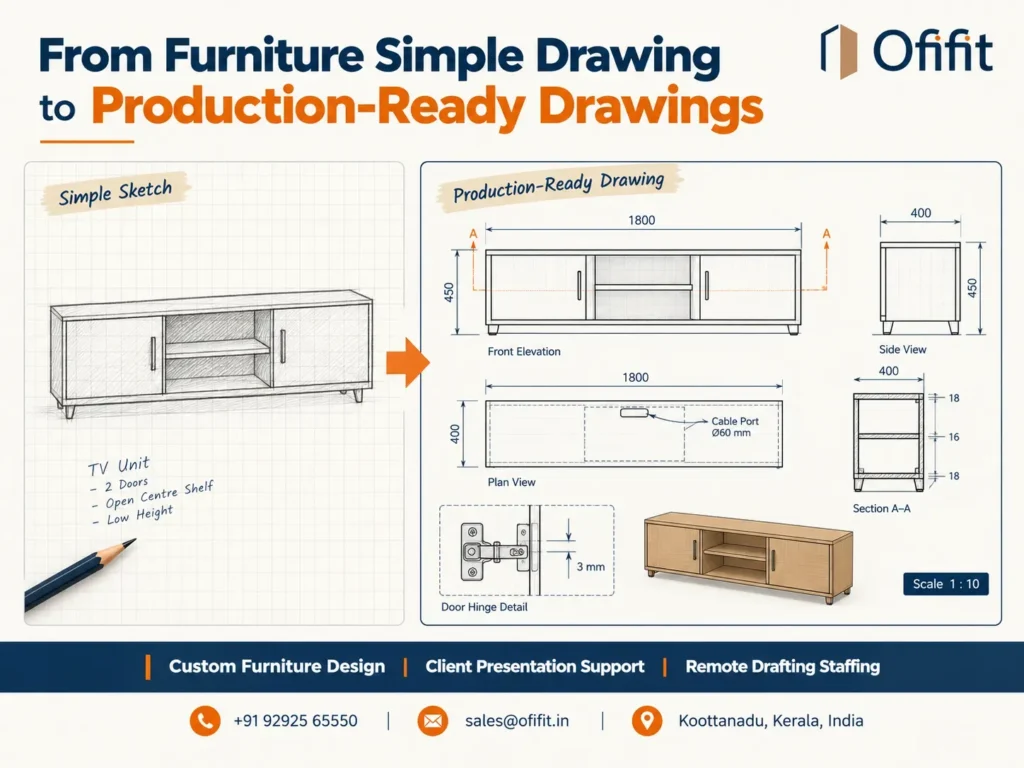
A good furniture simple drawing gets you very far, but a factory needs more. It needs joinery details, hardware positions, material specifications, cutting lists and installation notes. That is the job of a shop drawing.
This is where Ofifit comes in. We turn client concepts, references and drawings into production ready shop drawings, CNC files and installation guides. A standard set from our furniture technical and production documentation service includes plans, elevations, sections, detail call outs, a cutting list, a hardware schedule, a material specification and an assembly sequence.
Our other services cover the rest of the journey:
• Custom furniture design and development, built around your dimensions, materials and manufacturing limits
• Client meeting and live presentation support, with concepts and visuals for your client discussions
• Remote furniture design and drafting staffing, for a dedicated designer or drafter without a full time hire
Getting started is simple. Send your furniture simple drawing, a photo or a sketch on WhatsApp. You’ll get a scope and turnaround estimate, usually the same working day. Revisions are included.
Coming Up Next on the Ofifit Blog
Once your idea is on paper, the next question is how it reaches the factory floor. In our next guide, Sketch of Furniture to Shop Drawing: How Furniture Ideas Become Production Files, we follow a sketch of furniture through every stage: measuring, drafting, checking, CNC preparation and final production files. If you’ve ever wondered what happens between “I like this design” and “the factory is cutting boards,” that article is for you. Keep an eye on the Ofifit blog.
Common FAQs About Furniture Simple Drawing
1. Do I need drawing skills to make a furniture simple drawing? No. If you can draw a straight line with a ruler and read a tape measure you can do it. Accuracy matters far more than an artistic skill.
2. Which scale is best for beginners? Start with 1:10 for single pieces and 1:50 for room layouts. Graph paper makes both easy to manage.
3. How many views should a furniture simple drawing include? A plan and one elevation are enough for most beginners. Add a side view or a section views when the piece has hidden or complex parts.
4. Can a furniture simple drawing go straight to production? Usually not. It’s ideal for planning and briefing, but manufacturing needs a full shop drawing with joinery, hardware and material details.
5. Can I send a hand drawn furniture simple drawing to Ofifit? Yes. Send a clear photo or scan on WhatsApp, along with any key sizes. We’ll review it and reply with a quote and timeline.
Final Thoughts
A furniture simple drawing is the smallest step along with the biggest payoff. It compel you to think about size, space and structure before any money is spent. Pick up a pencil, choose a scale, draw the plan, add the elevation and write the dimensions. Do it for a few times and your confidence will grow faster.
When your idea is ready to be built then Ofifit is here to turn it into precise production ready drawings your workshop can trust.
Stay Connected With Ofifit
Want more drawing tips, project updates and behind the scenes workshop moments? Follow us:
• Visit the Ofifit website for services and guides
• Like Ofifit on Facebook for company news and updates
• Follow Ofifit on Instagram for drawings and studio process
• Subscribe to Ofifit on YouTube for walkthroughs and how to videos
• Connect with Ofifit on LinkedIn for GCC industry insights